Series 900
An Oak Hamper starts Series 900 followed by an eye-catching cedar Butterfly House! Watch the butterflies from the Garden Swing, functional, beautiful and satisfying to build. Start recycling in your home with this Recycle Bin a modern necessity. Have time and information at your fingertips with The Data Cube and The Clock Book featured in this series. Next up the Ironing Board Cabinet a project that is attractive and useful! Bob and Rick show you how to make a roll top with a special shop-made fixture used to build the Bread Box. The series concludes with the Patio Planter. Great summer projects included in this series of "the Router Workshop".
901 - 902 Two Part - The Hamper
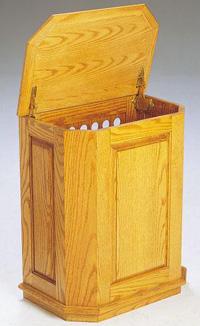
The first episode of this new series is a two-part project, "The Hamper", a beautiful oak furniture piece for the bathroom. In part 1, Rick works on the lid, the base and the moldings while Bob uses a special router fence to bevel the angle pieces that fit between the front and side panels. In the second part of "The Hamper", Rick and Bob show you how to rout beautiful oak panels for the front and sides of the hamper and how to make and use an egg crate fixture to cut the ventilating holes in the back of the hamper. Join us for "The Hamper" on the Router Workshop. 901. The Hamper, Part 1 902. The Hamper, Part 2 Order E Plan U.S. Customers Click Here! Canadian Customers Click Here!
903 - The Butterfly House
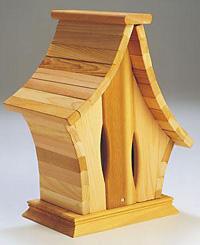
An eye-catching cedar house for butterflies, "The Butterfly House" is the next project on the Router Workshop. Craftsmen, Bob and Rick Rosendahl show you how to use matching bits to shape the wall and roof pieces to fit together in a smooth rounded contour. You'll also discover how to make ellipse openings and shape the gables with pattern fixtures. That's "The Butterfly House" today on the Router Workshop.
904 - 905 Two Part - The Garden Swing
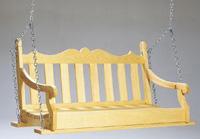
In this episode "The Garden Swing", master craftsmen Bob and Rick Rosendahl reveal important tips to mortising and shaping the swing arms. The mortises must be done first, then glue on the knob ends and shape the arms. Top it off by rounding the arm pieces. Bob and Rick complete the pine "Garden Swing" in the second of the two part series on the Router Workshop. Rick uses a pattern fixture to shape the top rail of the back while Bob shows you how to measure and cut the mortises to accept the back slats. Functional, beautiful and satisfying to build, it is The Garden Swing on the “Router Workshop"! 904. The Garden Swing, Part 1 905. The Garden Swing, Part 2
906 - The Recycle Bin
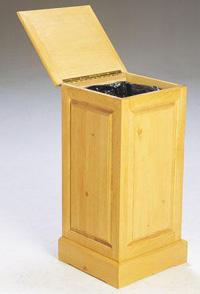
In this episode of the Router Workshop, Bob and Rick produce a unique paneled "Recycle Bin". Slots and splines secure the moldings to the plywood lid. Panels, rabbet/dado joinery and a useful metal bag holder make this "Recycle Bin" a modern necessity. Recycle with this neat container by building your own "Recycle Bin" shown today on the Router Workshop.
907 - Data Cube and Clock Book
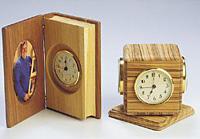
Bob Rosendahl makes a perfect wooden book that opens to display a picture in the cover and a clock in the "Book Clock". Rick reveals the secret to making perfect circles for the dials in "The Data Cube" and shows you how to mount the cube on a swivel. Have the time and information at your fingertips with "The Data Cube" and "The Clock Book" today on the Router Workshop.
908 - 909 Two Part Ironing Board Cabinet
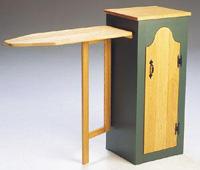
The Router Workshop presents a project that is beautiful and useful, "The Ironing Board Cabinet”. Watch Rick make dados the easy way and a 45 degree hidden joint to cover the end grain. Master Craftsman, Bob Rosendahl fastens the facing with mortise and tenon joinery. Bob and Rick complete the "Ironing Board Cabinet" in the second of a two-part series, showing viewers how to use the router and a pattern fixture to shape the ironing board, the round top door and facing. Cut the relief for the toe space with a router jointer fence. This completes the "Ironing Board Cabinet" today on the Router Workshop. 908. Ironing Board Cabinet, Part 1 909. Ironing Board Cabinet, Part 2
910 - Fan Box
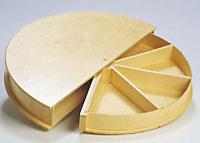
Today on the Router Workshop Bob and Rick work with a circle fixture to complete a unique box shaped like a fan. Tolerances are very close when a rotating storage tray disappears inside the half round "Fan Box". Bob and Rick show you how to cut the round and bend plywood to make the sides of the box. A tray with dividers provides storage and rotates inside the "Fan Box" today on the Router Workshop.
911 - 912 Two Part - The Bread Box
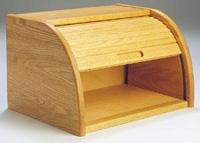
In the first of a special two-part series, "The Bread Box", master craftsmen Bob and Rick Rosendahl show you how to make and use a special holding fixture for the planer to angle-cut and plane the roll top pieces. They also show how to slot the sides of "The Bread Box" to hold the roll top by using a shop-made fixture. In part 2 of “the Bread Box”, Rick uses bullnose and cove bits to mold the edges of the roll top sticks. This allows the sticks to fit together and roll smoothly in the side slot. Bob uses fixtures to rout a hand pull and shape the ends of "The Bread Box". This is an old-fashioned roll top using picture wire and connectors instead of canvas backing. See "The Bread Box" on the Router Workshop. 911. The Bread Box, Part1 912. The Bread Box, Part 2
913 - The Patio Planter
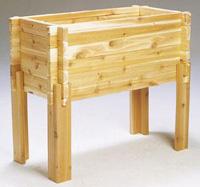
Up on legs, "The Patio Planter" is suitable for the patio or back yard. It is featured in this program of the Router Workshop. Rick clamps a series of pieces together in a holding fixture and uses a portable router to cut the interlocking knotches in all the pieces at once while Bob routs the leg slots. This take-apart planter requires no fastening other than the interlocking joinery to hold it together. "The Patio Planter" is shown on the Router Workshop.