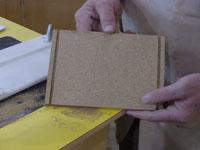
Christmas Gift Box!
Bob and Rick have designed a special Christmas Gift Box and have taken on a huge job of constructing over 300 for the upcoming holiday season! This gift box will contain chocolates from Mordens, a local chocolate manufacturer in Winnipeg. The gift box design takes the following into consideration; the required number of boxes, number of pieces to be cut, the size of the box, material used, the method of assembly and finally the joinery. There are 300 names on the Christmas list so the amount of boxes will be 300! That’s 1800 pieces, which need to be molded and shaped. The size of the gift box will be determined by the size of the chocolate boxes this means purchase the chocolates before starting construction but not to be eaten. It would be a sad day if the chocolates didn’t fit into the gift boxes after they were built. The material used is WOODSTALK board, which is an environmentally friendly fiberboard, made from Straw by DOW Bioproducts. The Rabbet/Dado combination joint makes it easy to assemble and gives solid 90-degree joinery
Calculating The Number Of Peices
The size of our Gift Box is as follows:
2 - 1 3/4" x 7 1/2" x 1/2" Sides
2 - 1 3/4" x 7" x 1/2" Ends
1 - 7 3/4" x 7 3/4" x 1/2" Top
1 - 8 1/2" x 8 1/2" x 1/2" Bottom
In terms of 300 boxes, which include a rabbet cut as well as a dado cut you are looking at 4800 cuts! The key to a job this size is to make as few cuts as possible and most importantly to keep things safe!
The final size of our upright pieces are 1 3/4” high. This will mean that we require 1200 sides that need to be molded on both ends or 2400 passes by the router.

It is not only difficult to get an accurate cut with pieces this small, the size is also small enough that you run the risk of injury when trying to hold this piece in place. To avoid using pieces this size we are going to cut the pieces to the correct length but leave them in a width wide enough to make three sides instead of one side. Now we have only 400 pieces that need 800 cuts on the ends that is a lot different than 1200 pieces that need 2400 cuts.
Making the Rabbet/Dado Joint in 7/16” thick material:
Dado Cut
The dado was cut with a 3/16” router bit and a spacer fence. This fence was chosen because it provides a flat surface to work on and there is not a recess for the router bit that the stock may dip into as you pass the cutter. It is essential this does not happen when cutting the dado because if the dado is not straight the rabbet will not fit. The spacer fence is set 1/4” distance away from the router bit which is determined by the thickness of the material. The thickness of the material is 7/16” minus the dado which is 3/16” wide leaves 1/4” to make the joint flush on the outside edges. The height could be set at any height but for simplicity it is set at 3/16”. To make the corners rounded use the 3/8" round over router bit.

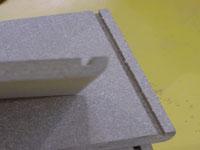
Rabbet Cut
The dado groove is set 1/4” from the end to match the material thickness, is 3/16” wide and set at a depth of 3/16”. To make the rabbet cut that will match the dado it was decided to use a table fence and a rabbet bit.


To set the correct height lay a 3/16” brass measuring bar across the base plate under the rabbeting bit, lower the router bit on top of the brass bar and lock the router height in place. Remove the brass bar and we have the thickness of the rabbet on the ends to match the dado width.

The depth of the rabbet cut is next and will have to match the depth of the dado, to keep things simple this is 3/16”. To set the depth of the rabbet we set the fence 3/16”away from the rabbeting bit again by using the 3/16” brass bar. The cut of the rabbet is always accurate and it will fit into the dado without any hassles.
Cutting To Size:
Use a table saw and set the fence to the correct measurement for the height of the sides. Our sides are 1 3/4”. Now we can start cutting our 300 pieces into the required 1200!


Always use a safety push stick to keep your hands away from the saw blade. We also set up a bin on the out-feed side of the table saw to catch the pieces as we cut, this avoids damaging and picking up the pieces later!
Don’t be afraid of projects this size, simply get organized and keep things simple! Use measurements that are easily divided into four (the required number of uprights for the box).
Next Week!
Simple gluing tricks for numerous pieces and finally a peak at the finished box!