Wood Bending Jig
The curved legs for the Bent Wood Coffee Table were created from 1/8" strips of oak and molded in a shop made jig. Today we will discuss the construction of this jig.
Project Planning
It is always best to do a layout on paper before working on any finished template. Our drawing called for legs that were 16 1/4" wide x 7 1 /2" high x 3/4" thick. We used 6 layers of 2 1/4" x 30" x 1/8" oak for each leg. The two U-shaped legs are attached to a stretcher.
The first thing we have to do is make a template to cut a 3/4" wide groove in a piece of plywood that will match the shape of our legs drawn on the paper.
Making The Template
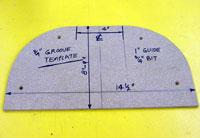
We chose a 1" guide and a 3/4" straight bit to cut the plywood. Because there is 1/8" between the guide and the edge of the cutter, the template must be 1/4" narrower so that the finished groove is 14 3/4" wide on the inside and 16 1/4" on the outside. We made a template out of 1/4" MDF that was 14 1/2" wide and approximately 9" high. There is a 4" long flat surface on the top before the radius starts.
Cutting The Plywood
Screw the template to a piece of 14" x 21" x 3/4" plywood. Then screw a backer board on the underside of the plywood. Secure it on both the inside and outside of the cut line so the plywood doesn't move during the cutting.

Set the depth of cut to approximately 1/8" and make the first cut moving right to left. (Note: we used double stick tape to attach thin strips around the outside of the template to keep the base plate level when cutting.)

Make two or three more passes until you have cut right through.

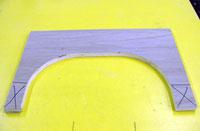
You now have the inside and outside part of our bending jig. Lightly sand the edges.

The bottom ends must be cut off to allow the six layers of 1/8" oak to fit between the template when clamping.
You can repeat this process until you have a total of three inside and two outside pieces for the bending jig. NOTE: We also need two additional outside pieces to make our cut-off jig (see Table Saw Cut-Off Jig). OPTION: After cutting the inside and outside piece they can be used as templates. Simply screw them to scrap plywood, bandsaw off excess material and trim with a flush trim bit on a table mounted router.
Assembling The Jig
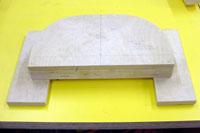
Screw the three pieces of plywood together to form the inside and outside templates.
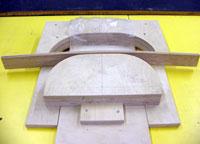
On the backside of the outside template attach a piece of 11" x 26" x 3/4" plywood.

A 3" x 5" stop block was screwed to the 11" x 26" x 3/4" plywood on the face side 13 3/4" from the inside edge of the template. This holds the inside template in position while the oak layers are being positioned. Plastic was placed between the inside and outside template, this eliminates any excess glue from setting on the jig while the legs are drying.

The inside template slides into place over the outside template.

Bending The Wood
We used six 1/8" oak strips for the legs. It is a good idea to keep extra pieces on hand when gluing these strips in case one or two break during clamping. Apply glue between each piece, place them in the jig (position as illustrated with one piece below).
Then we clamped the legs tight to the inside template.

After the legs are all glued up, joint one edge and then cut to width on the table saw.
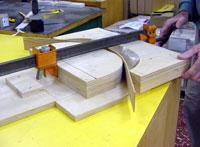
Table Saw Cut-Off Jig
We made a jig to hold the legs in place for cutting off at 7 1/2" on the table saw.
The two extra outside template pieces you cut earlier will make our cut-off jig. Screw two pieces of 3/4" plywood together and attach a 1/4" plywood backer board. The edge of the plywood is 7 1/2" to the template. We used two hold down clamps on either side to hold the leg in place when cutting.
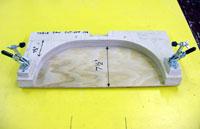
Place one of the legs into the template to check the fit. Some legs may have "spread back" a little wider than 16 1/4" after gluing. If so, you need to sand the template to suit the legs.
Use a bar clamp and hold down clamps to center and hold the legs when cutting on the table saw.
