Facing Plywood Edges
In the Executive Desk from Series 1200 we used the butterfly method of attaching the facing. This tip will show you an alternate method of facing plywood edges. The sides and the bottom shelf of the nightstand from Series 300 of the Router Workshop are plywood and need to be faced with solid material.
The Set Up
Chuck up a 3/4” V Groove bit in a table mounted router. In the case of the nightstand the pieces are large and since they must be held on edge against the fence we used a higher shop made fence to help hold the pieces. Depending on the size of your stock pieces you may be able to use a regular table fence as we are showing here.
Clamp the fence to the table to expose enough of the bit to make a V in the edge of the plywood and cut a sample piece to check that it is centered. Make the fine adjustments with your hammer.

Making The Cut
When you are satisfied with the setup, cut a 45 degree V centered in the exposed plywood edges that require the facing. Be sure you are holding the face side of the plywood against the fence.

Cutting The Facing
Cut a piece of 3/4” square solid wood (material of your choice) enough to cover the plywood edges you want to face. If your project requires two sides as ours did, one piece will face both plywood sides. For a perfect fit use the 45 degree bit to chamfer the edge of the square that fits down in the groove.
Final Assembly
Glue the square stock into the V cut made in the plywood edge. If you are doing two sides, glue them to the square before cutting it apart.
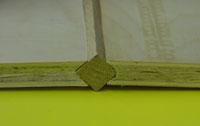
When the glue is set, cut the two sides apart through the middle of the square. Trim and sand the solid edge to make a perfect facing on the plywood.